

How to Grow Broccoli Sprouts at Home (In 3 Days)
Broccoli sprouts are my go-to source for natural, food-based vitamin C and sulforaphane. They are simple to grow, extremely nutrient dense, and easy to work into my regular diet.
This post may contain affiliate links. Please see our site disclosure for more information.


Making broccoli sprouts at home is a no-brainer. Between the health benefits, the cost-benefit analysis, and the extremely easy process, broccoli sprouts can easily be a regular food item in your diet.
Follow along as I explain what broccoli sprouts are, why you should grow and eat them, and how to make them at home.
What are Broccoli Sprouts?
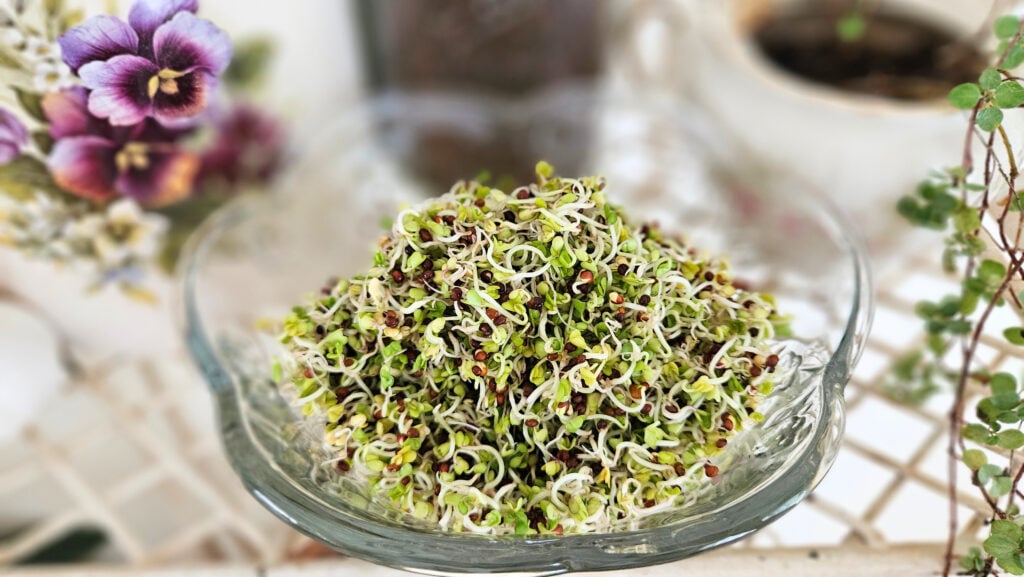
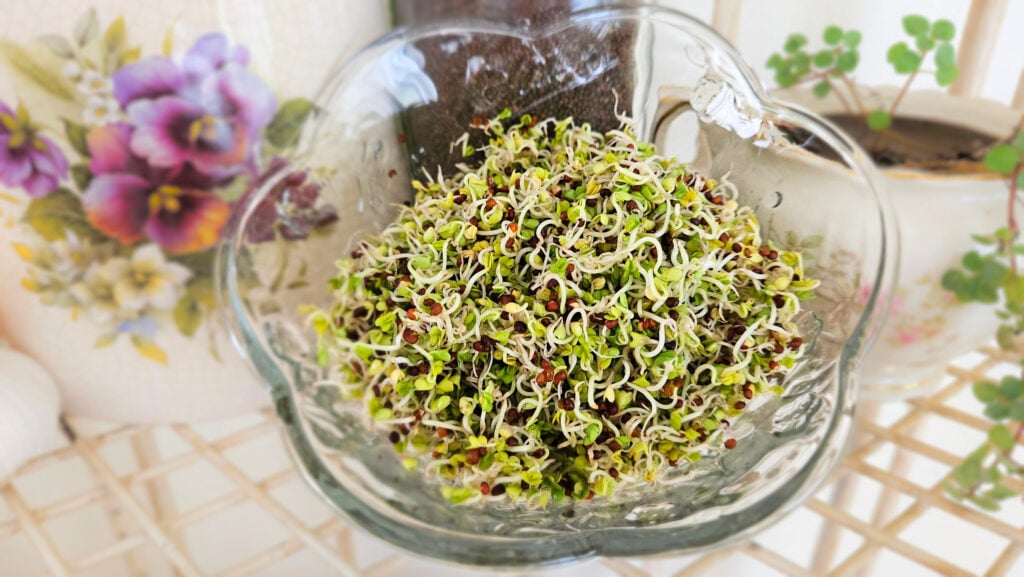
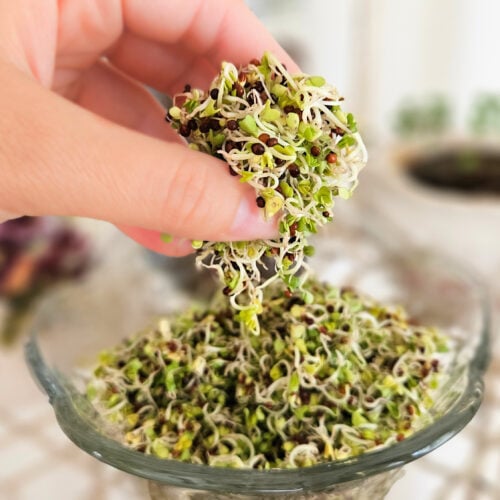
Broccoli sprouts are immature broccoli plants grown by germinating broccoli seeds through the process of soaking and rinsing for several days. They are known as tender, or baby plants.
Broccoli sprouts belong to the cruciferous vegetable family, with 100-400 times more sulforaphane than mature broccoli.
Broccoli sprouts resemble alfalfa sprouts. They have small, green leaves, and white stems which are attached to the seed. Broccoli sprouts have anywhere from a mild, to a peppery, to an almost spicy taste, similar to radishes. Their texture is slightly crunchy.
(source)
History of Seed Sprouting

China

Sprouting seeds for food is thought to have been practiced in China around 3,000 BCE. According to Chinese legend, sprouts were often used as remedies for various illnesses, such as scurvy. Sprouted mung beans are believed to have been eaten by Chinese sailors due to the high vitamin C content. Ancient Chinese herbalists also incorporated sprouts as part of their traditional remedies.
India
Sprouted lentils and beans have been a part of traditional Indian dietary habits for thousands of years. The ancient Indian system of medicine, Ayurveda, has recognized sprouts as pure, nutritious, life-giving foods. Sprouts were recommended for improved digestion, vitality, and overall health.
Middle East
People in the Middle East eventually began sprouting grains and legumes, some time after Asia and India. These sprouts were incorporated into the diet in regions where fresh fruits and vegetables were difficult to grow year-round.
Egypt
It is believed that growing wheatgrass, which is commonly recommended in American health circles, may have originated in ancient Egypt. Wheatgrass was consumed for the many health benefits, including rejuvenation and detoxification.
Africa
In Africa, grains such as millet and sorghum are common dietary staples. Sprouting these grains likely began as a way to extend the shelf life and make their food more digestible. Sprouted grains are usually ground into porridge or bread, offering necessary nutrition during droughts and shortages.
Europe
Seed sprouting emerged in Europe during the 18th century, likely influenced by trade with various nations. Similar to the Chinese sailors, the British Navy also used sprouts to prevent scurvy on long voyages.
The West
The health movements of the 20th century popularized sprouting for food in the 1960s and 1970s. During this time, people were emphasizing natural and whole foods. Growing interest in vegetarianism and organic farming also fueled interest in sprouting. Sprouts such as alfalfa, radish, and broccoli were promoted as nutrient-dense living food which could easily be grown at home.
(source)
Why Eat Broccoli Sprouts?

There are many reasons to include broccoli sprouts in your diet, and many reasons to grow them at home vs. buying them at the store.
Health Benefits of Seed Sprouting
Seed sprouting offers tremendous health benefits for the human body.
- Sprouting allows the seeds to undergo enzyme changes that break down starches and proteins, making the sprouts more digestible
- Sprouts are excellent sources of vitamins, minerals, and antioxidants
- Higher concentrations of essential amino acids, fiber, and bioactive compounds
- Sprouting reduces phytic acid, which can block the absorption of nutrients
- Improved gut health and immune function
- Reduction of chronic diseases such as heart disease and diabetes
(source)
Health Benefits of Broccoli Sprouts
Sprouts as a whole are extremely healthy, but now we’ll focus on broccoli sprouts specifically. They pack a powerful punch of benefits!
Rich in Nutrients
- Vitamin C
- 60% of the daily value (DV) in a 3oz serving
- Vitamin A
- 10% of the daily value (DV) in a 3oz serving
- Protein
- 2 grams (3oz serving)
- Fiber
- 4 grams (3oz serving)
- Glucoraphanin/Sulforaphane
- 100-400x more glucoraphanin than mature broccoli. Glucoraphanin is converted into the phytochemical sulforaphane upon cutting or chewing the sprouts.
- 82% bioavailability- rapidly and easily absorbed by the body
- Powerful anti-cancer properties
- Increases detoxifying enzymes in the liver
Anti-Cancer Properties (Sulforaphane)
- Promote cancer cell apoptosis (cell death)
- Inhibit angiogenesis which feeds malignant cells
- Inflammation reduction
- Lower the susceptibility to cancer-causing substances
- Reduce the invasion and spread of cancer cells
- Help the liver eliminate potential cancer-causing effects from toxins or chemicals in food or the environment
- Epigenetic modulation- may help turn off and on certain genes that effect whether cancer is inhibited or expressed
- Can potentially combat breast, prostate, colon, liver, and lung cancer
Anti-Inflammatory Properties
- Sulforaphane may reduce inflammatory markers linked to arthritis
Reduction in Chronic Disease and Conditions
- Improved heart health- rich in CoQ10
- Diabetes- may improve insulin sensitivity
- May protect against strokes, Alzheimer’s, and Parkinson’s
- May improve symptoms of autism spectrum disorders
- May promote gut health- antioxidant and antibacterial properties
- Potent antibacterial effect against H. pylori, which can cause digestive tract infections, gastritis, and ulcers
(source)
Why Grow Broccoli Sprouts at Home
I have purchased broccoli sprouts at my local grocery store before, however I much prefer to make them at home.
Easy Process
If you haven’t noticed the trend yet, the “health” foods that I am most consistent in making are the ones that are the easiest to make! Broccoli sprouts are such a simple process to do at home yourself. It requires a few days, but you do very little for them during that time period.
Inexpensive
Buying your own broccoli seeds and sprouting them at home is much more economical than repeatedly buying store-bought broccoli sprouts.
To see a full breakdown of the cost-benefit analysis, please see here.
Ingredient Control
By making broccoli sprouts at home, I am in control of the whole process. No, there aren’t many ingredients involved, but the type of seeds used, and the type of water used, do make a difference.
The FDA recommends that commercially grown sprout seeds be soaked and sterilized with a 2% (20,000 PPM) calcium hypochlorite solution prior to the seeds being sprouted. This is recommended to reduce Salmonella and E. coli contamination.
When mass producing food, it is a much different environment than cooking in a home kitchen. It is a good thing to have proper sanitation protocols in place. However, I’d rather not soak my food ingredients in calcium hypochlorite, which is bleaching powder.
When I make my broccoli sprouts at home, they are:
- Made in a small batch
- I am the only one touching them
- My equipment and environment are clean
Therefore, I see no need to bleach my seeds prior to germinating them into sprouts. I take high-quality broccoli seeds and filtered water, and end up with a healthy end product free from chemicals and harmful bacteria.
(source)

ProOne G-Series Gravity Water Filter
This ProOne Gravity Water Filter is the best of the best. Through some meticulous research, my husband and I decided to buy a travel sized Berkey (can’t be too prepared on the go), but decided to buy ProOne water filters instead. Lab testing results are very impressive, removing heavy metals, pesticides, herbicides, fluoride, chlorine, bacteria, and much much more. Very happy with our decision.
**Recently bought by Culligan.
How to Grow Broccoli Sprouts at Home

If I have convinced you as to why you should grow broccoli sprouts at home and incorporate them into your regular diet, then let’s get into how to do it. I’ll be doing the jar method to grow them.
Ingredients
- 2 tbsp broccoli seeds
- Filtered water
Equipment
Instructions
Tap/click images for a description of each step ⬇️


- Rinse broccoli seeds with filtered water.
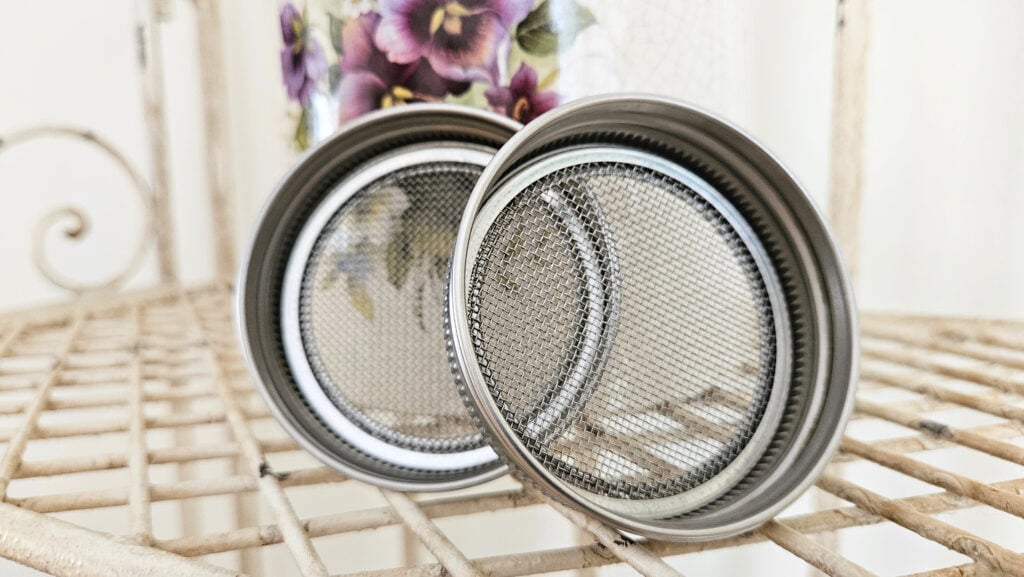
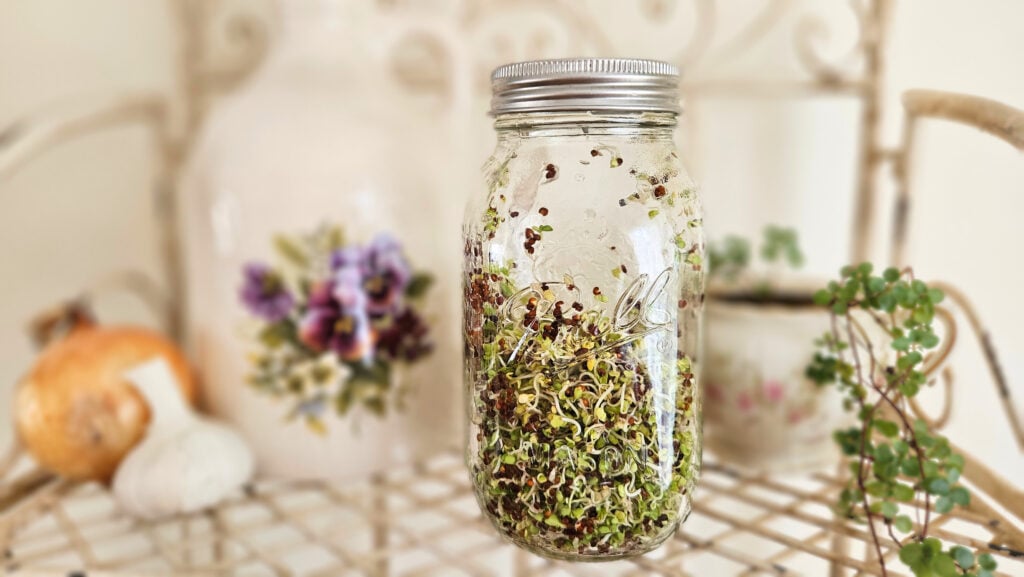
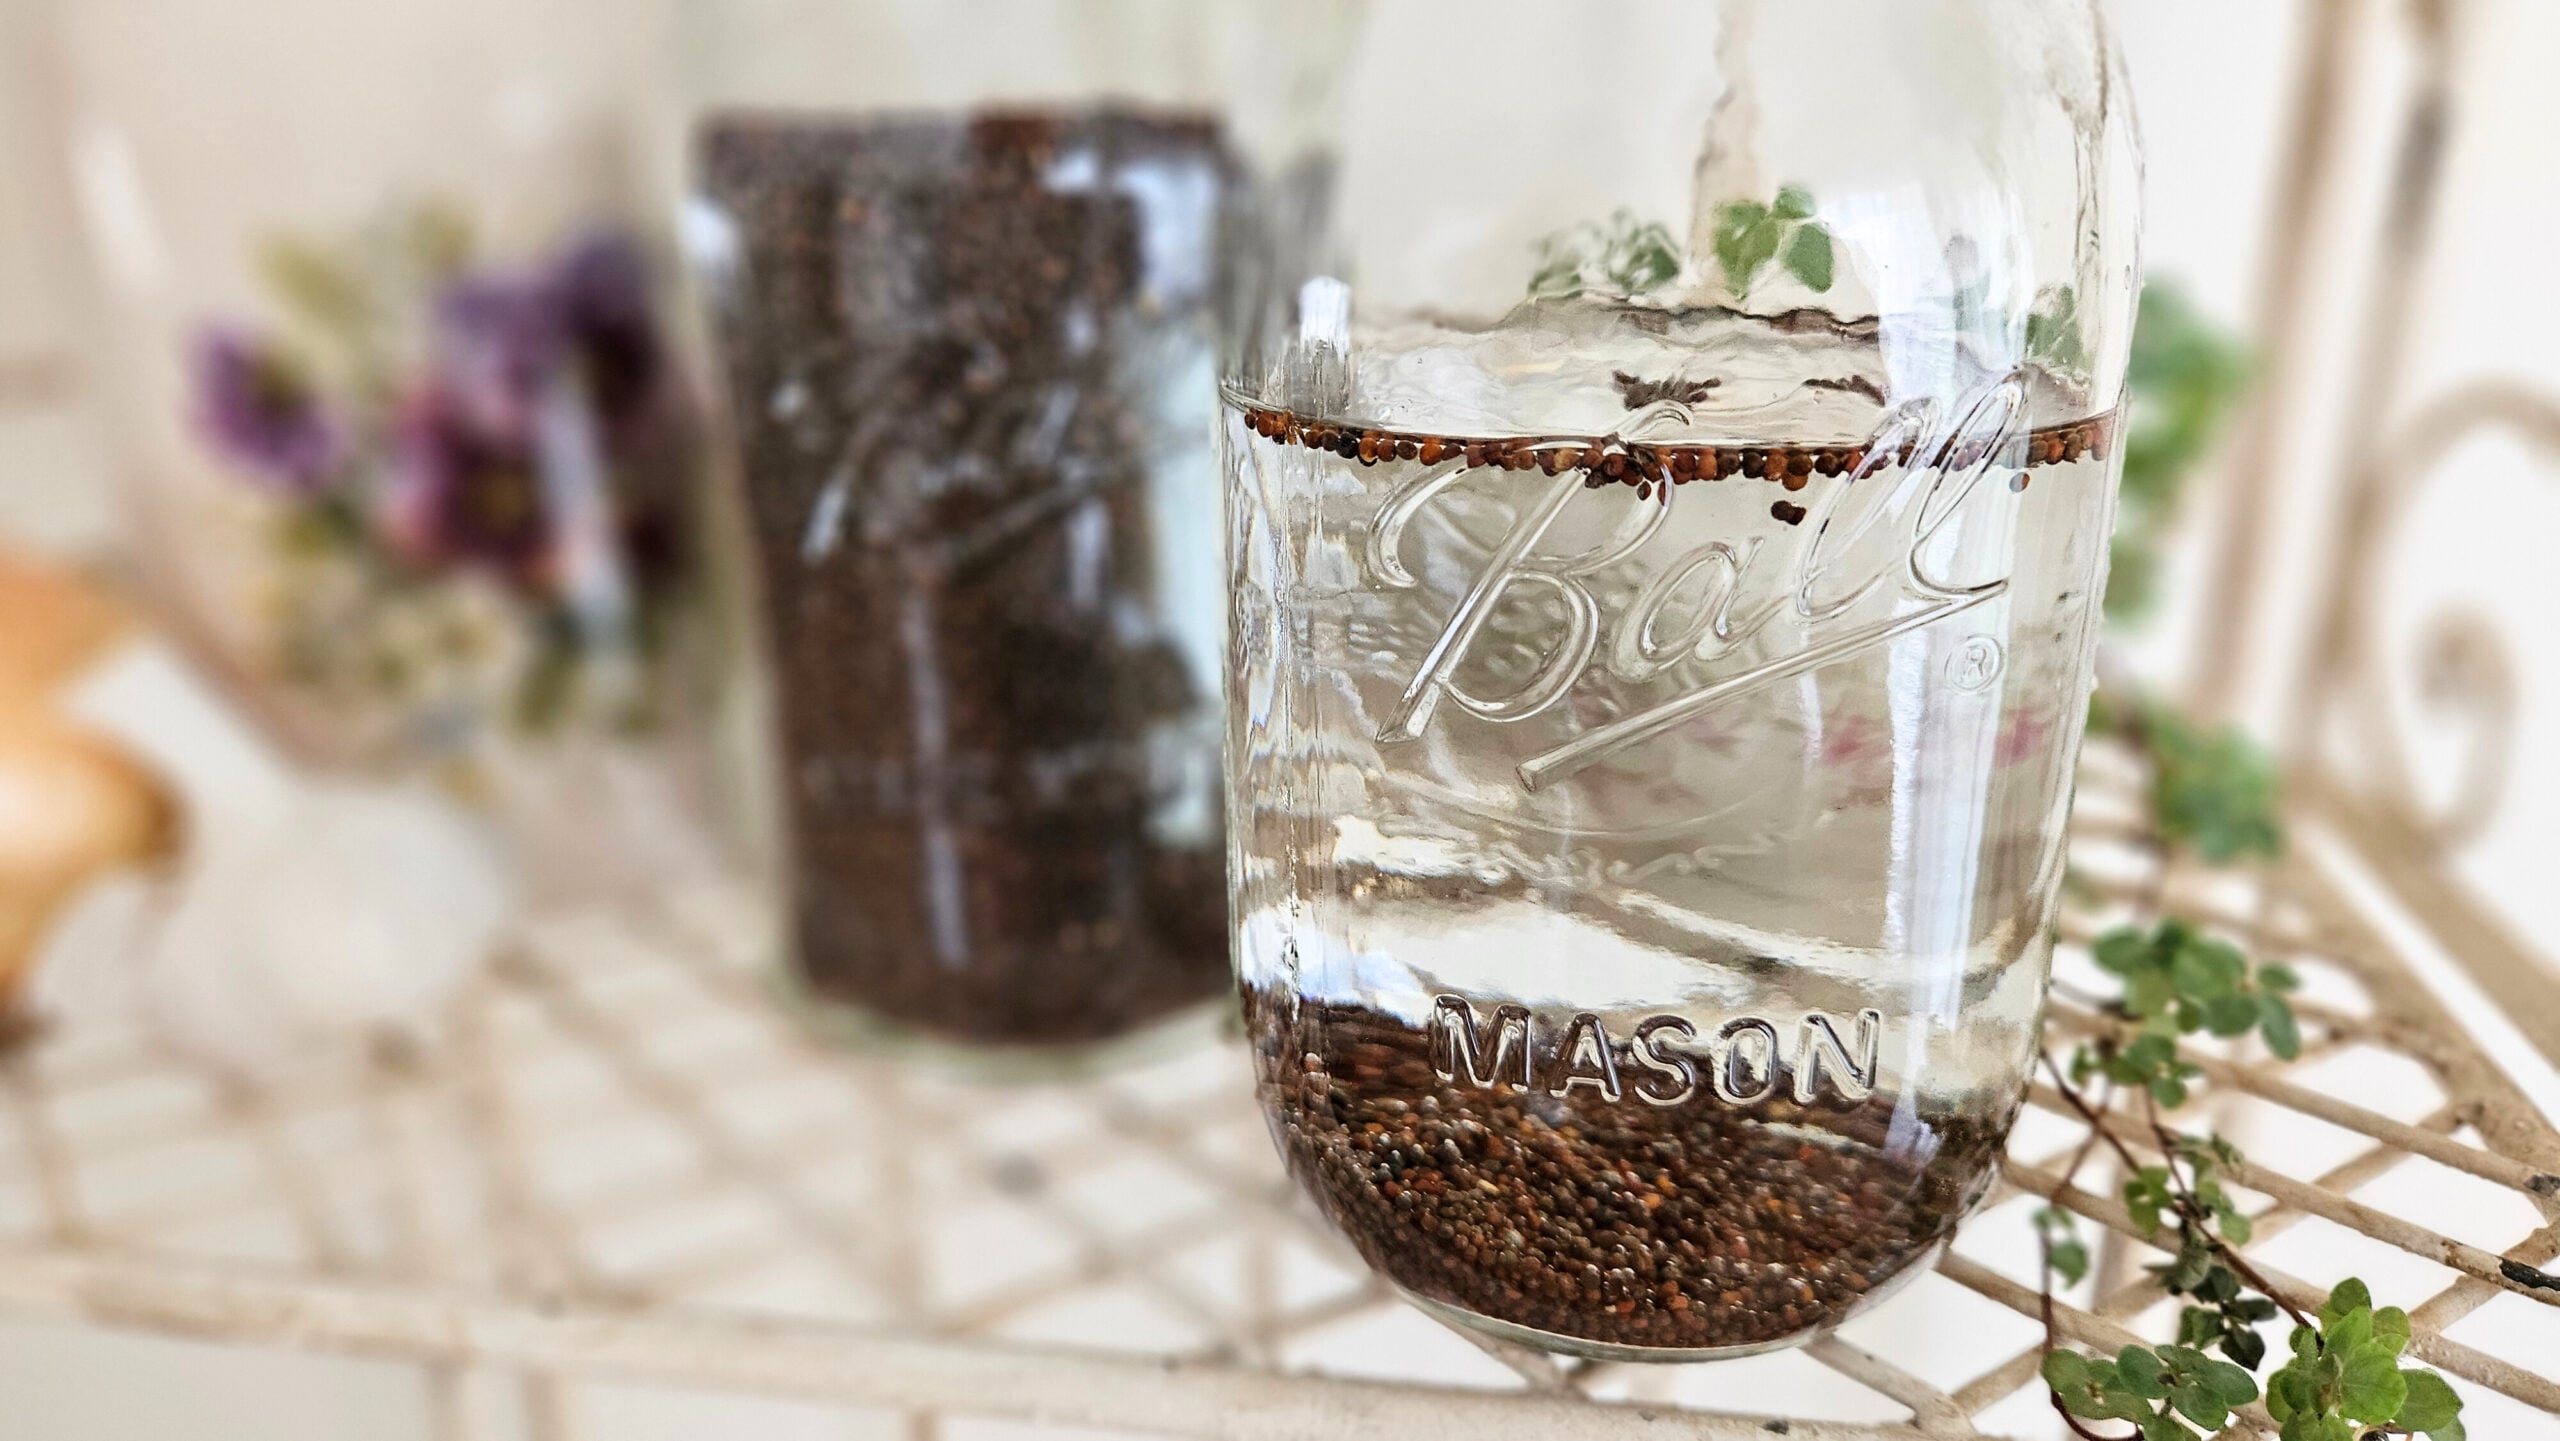
- Place seeds in a regular quart size mason jar. Fill with water 2/3 of the way full. Cover the jar with the seed sprouting lid.
- Allow the seeds to soak for about 8hrs. I usually either start this in the morning and let them soak all day, or start this at night and let them soak overnight.
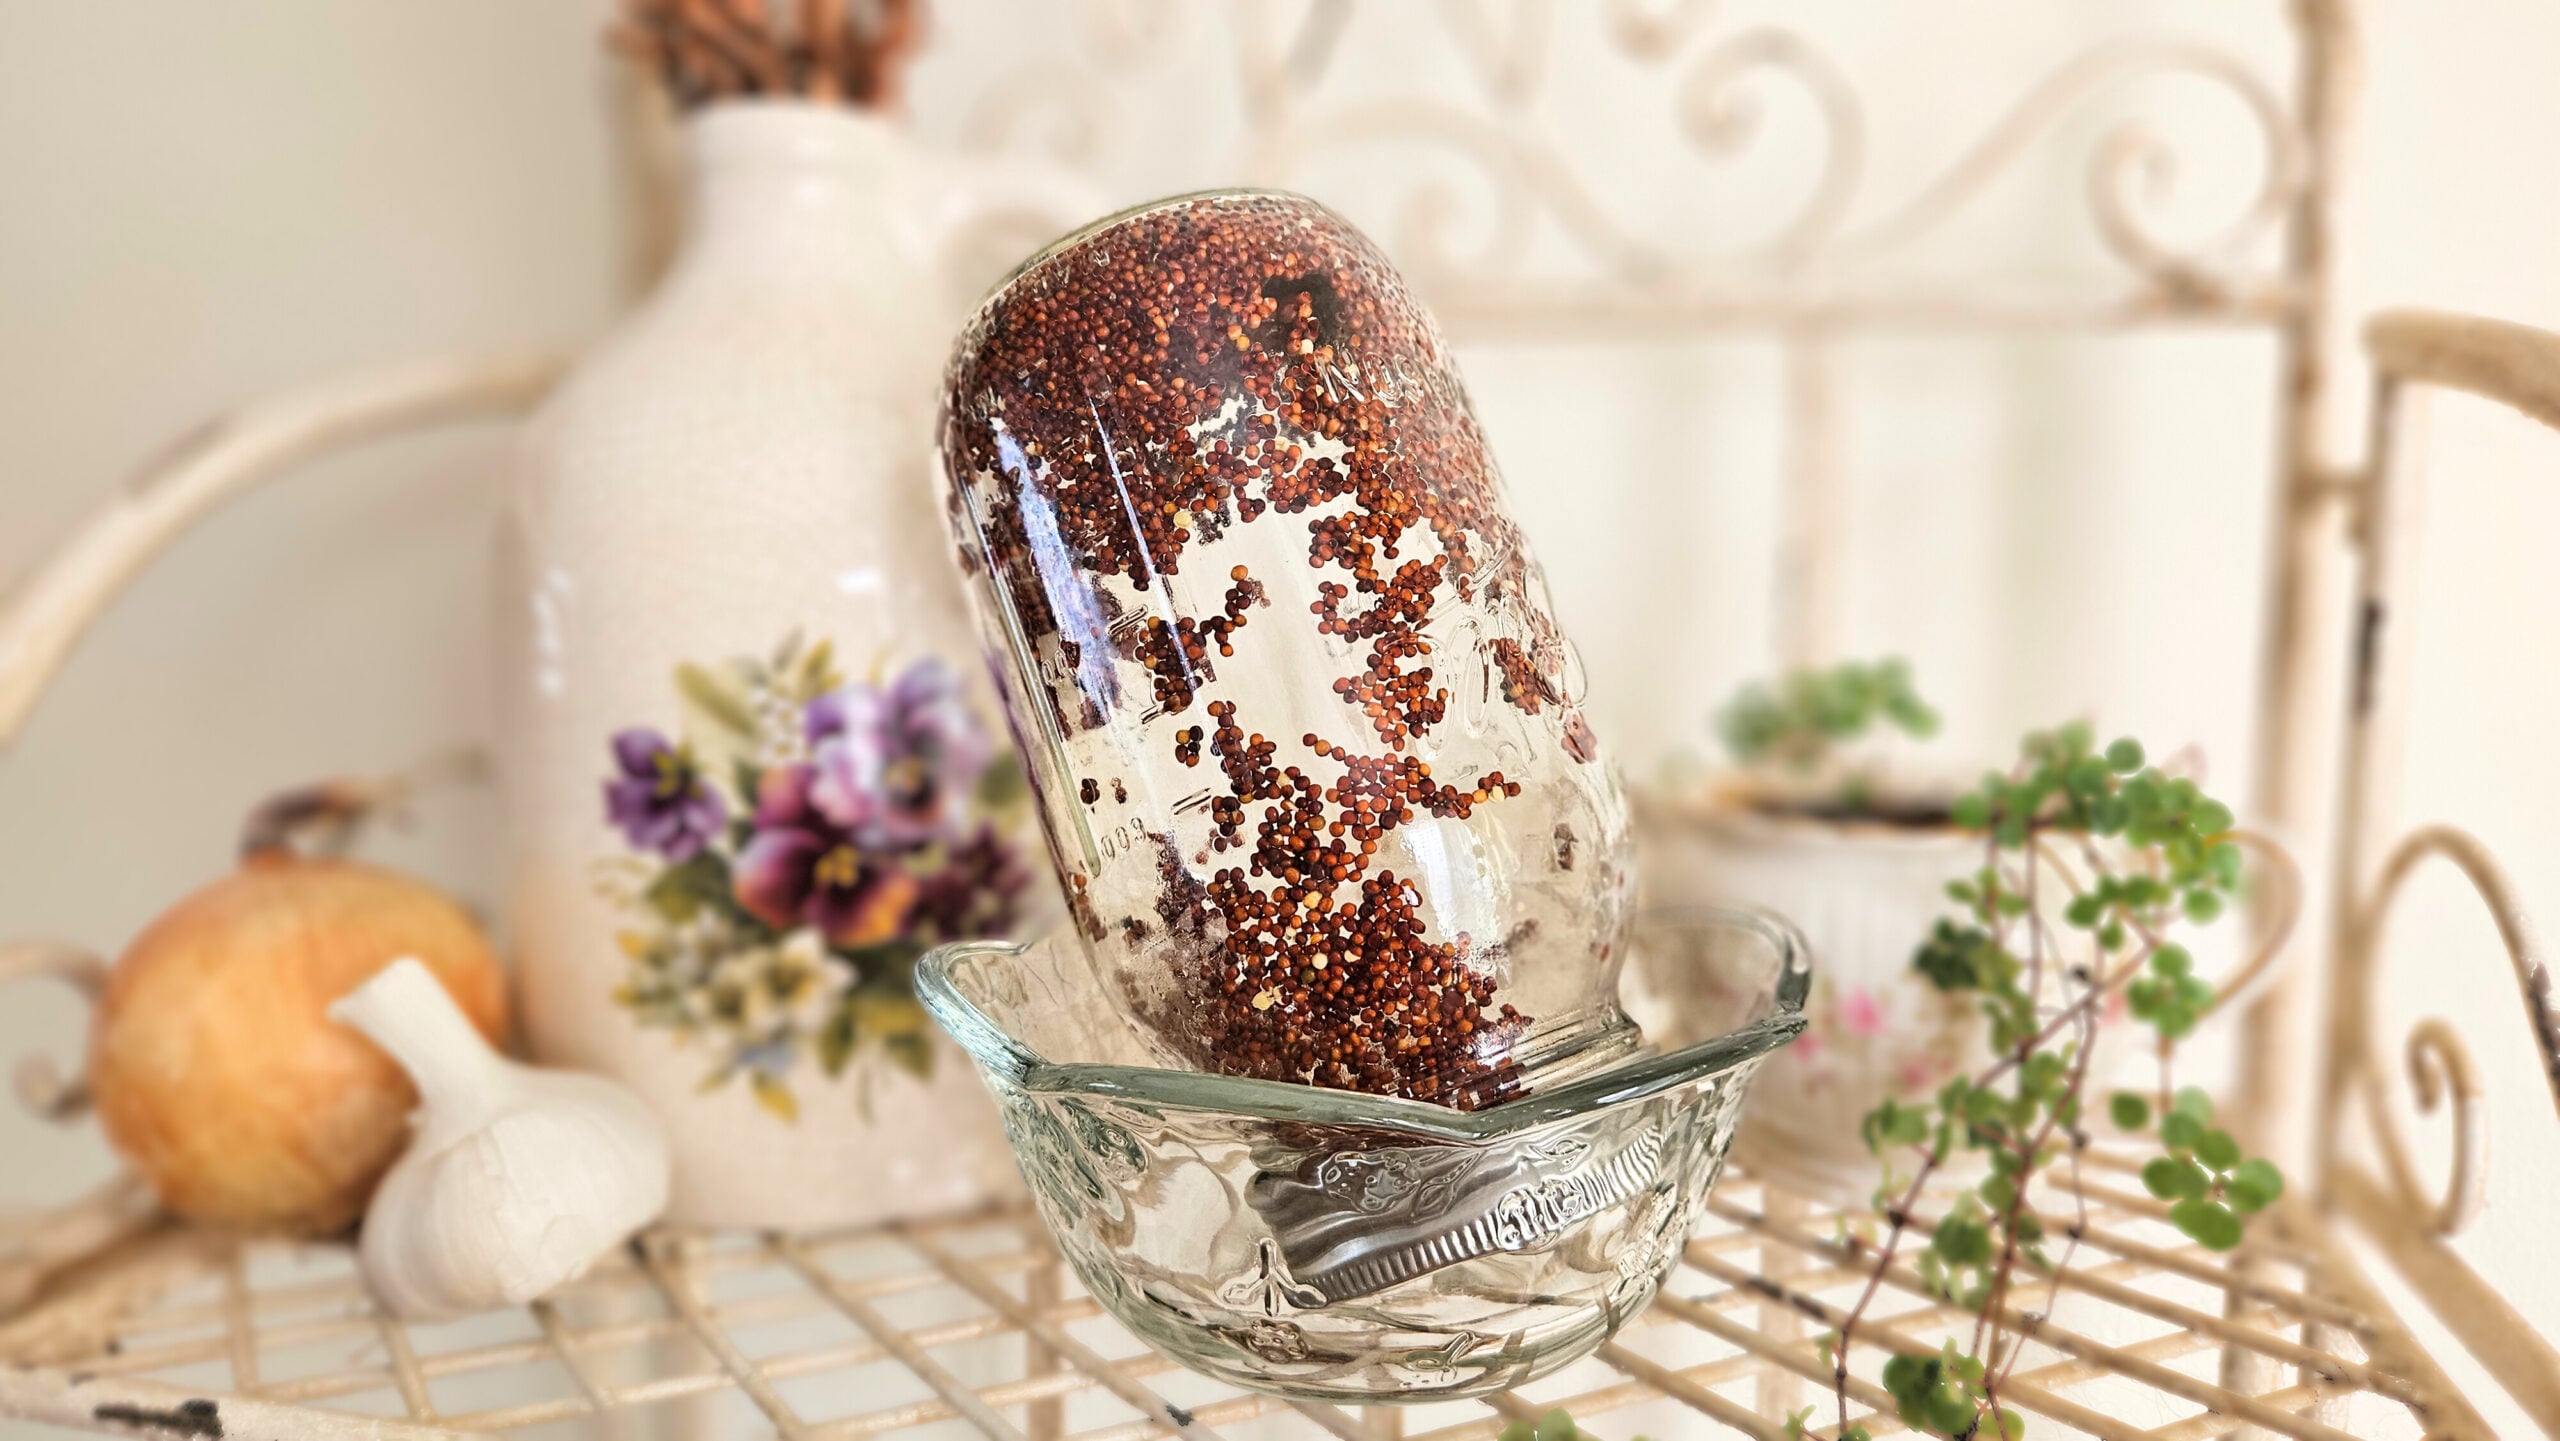
- After soaking, turn the mason jar upside down over your kitchen sink and allow all of the water to drain out. Shake the jar up and down to get the most amount of water out.
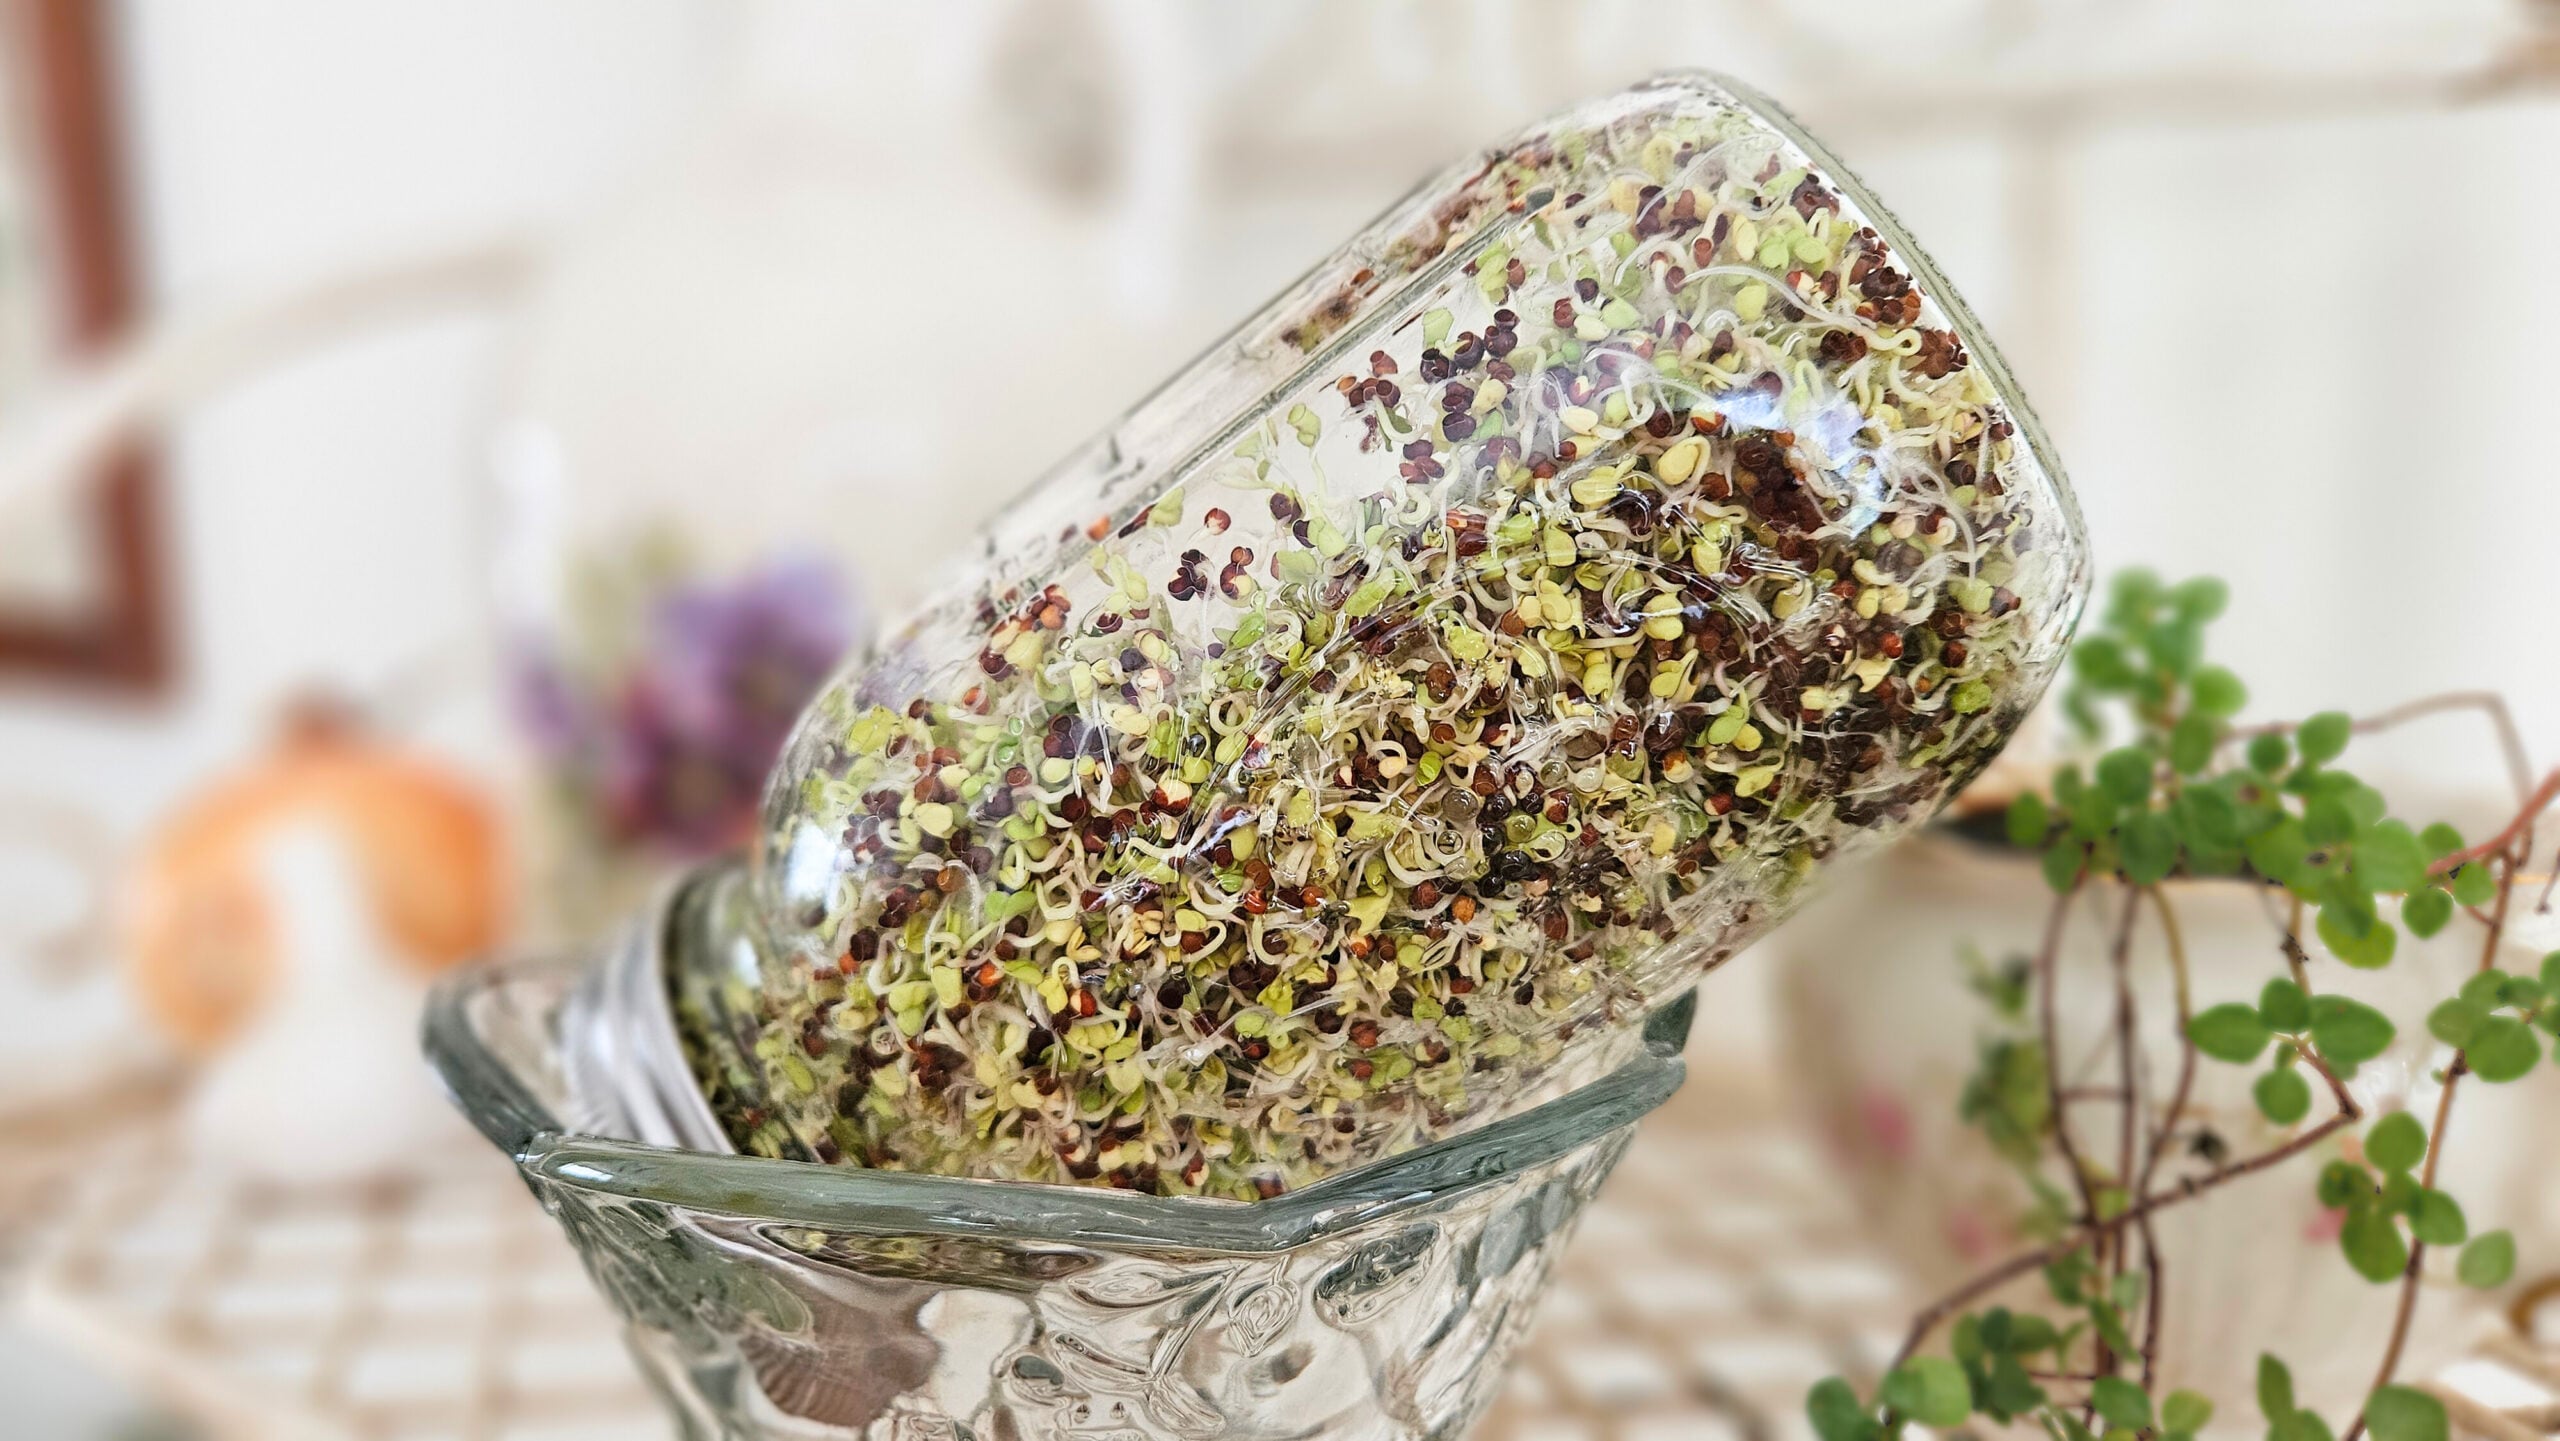
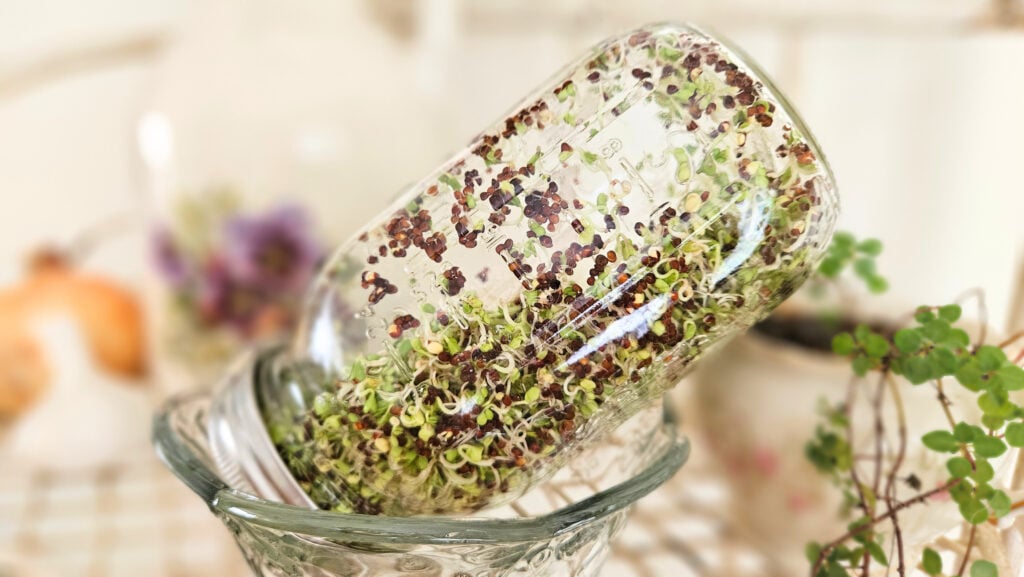
- Place the mason jar upside down in a bowl, so that the jar is tilting to the side allowing water drainage and air flow.
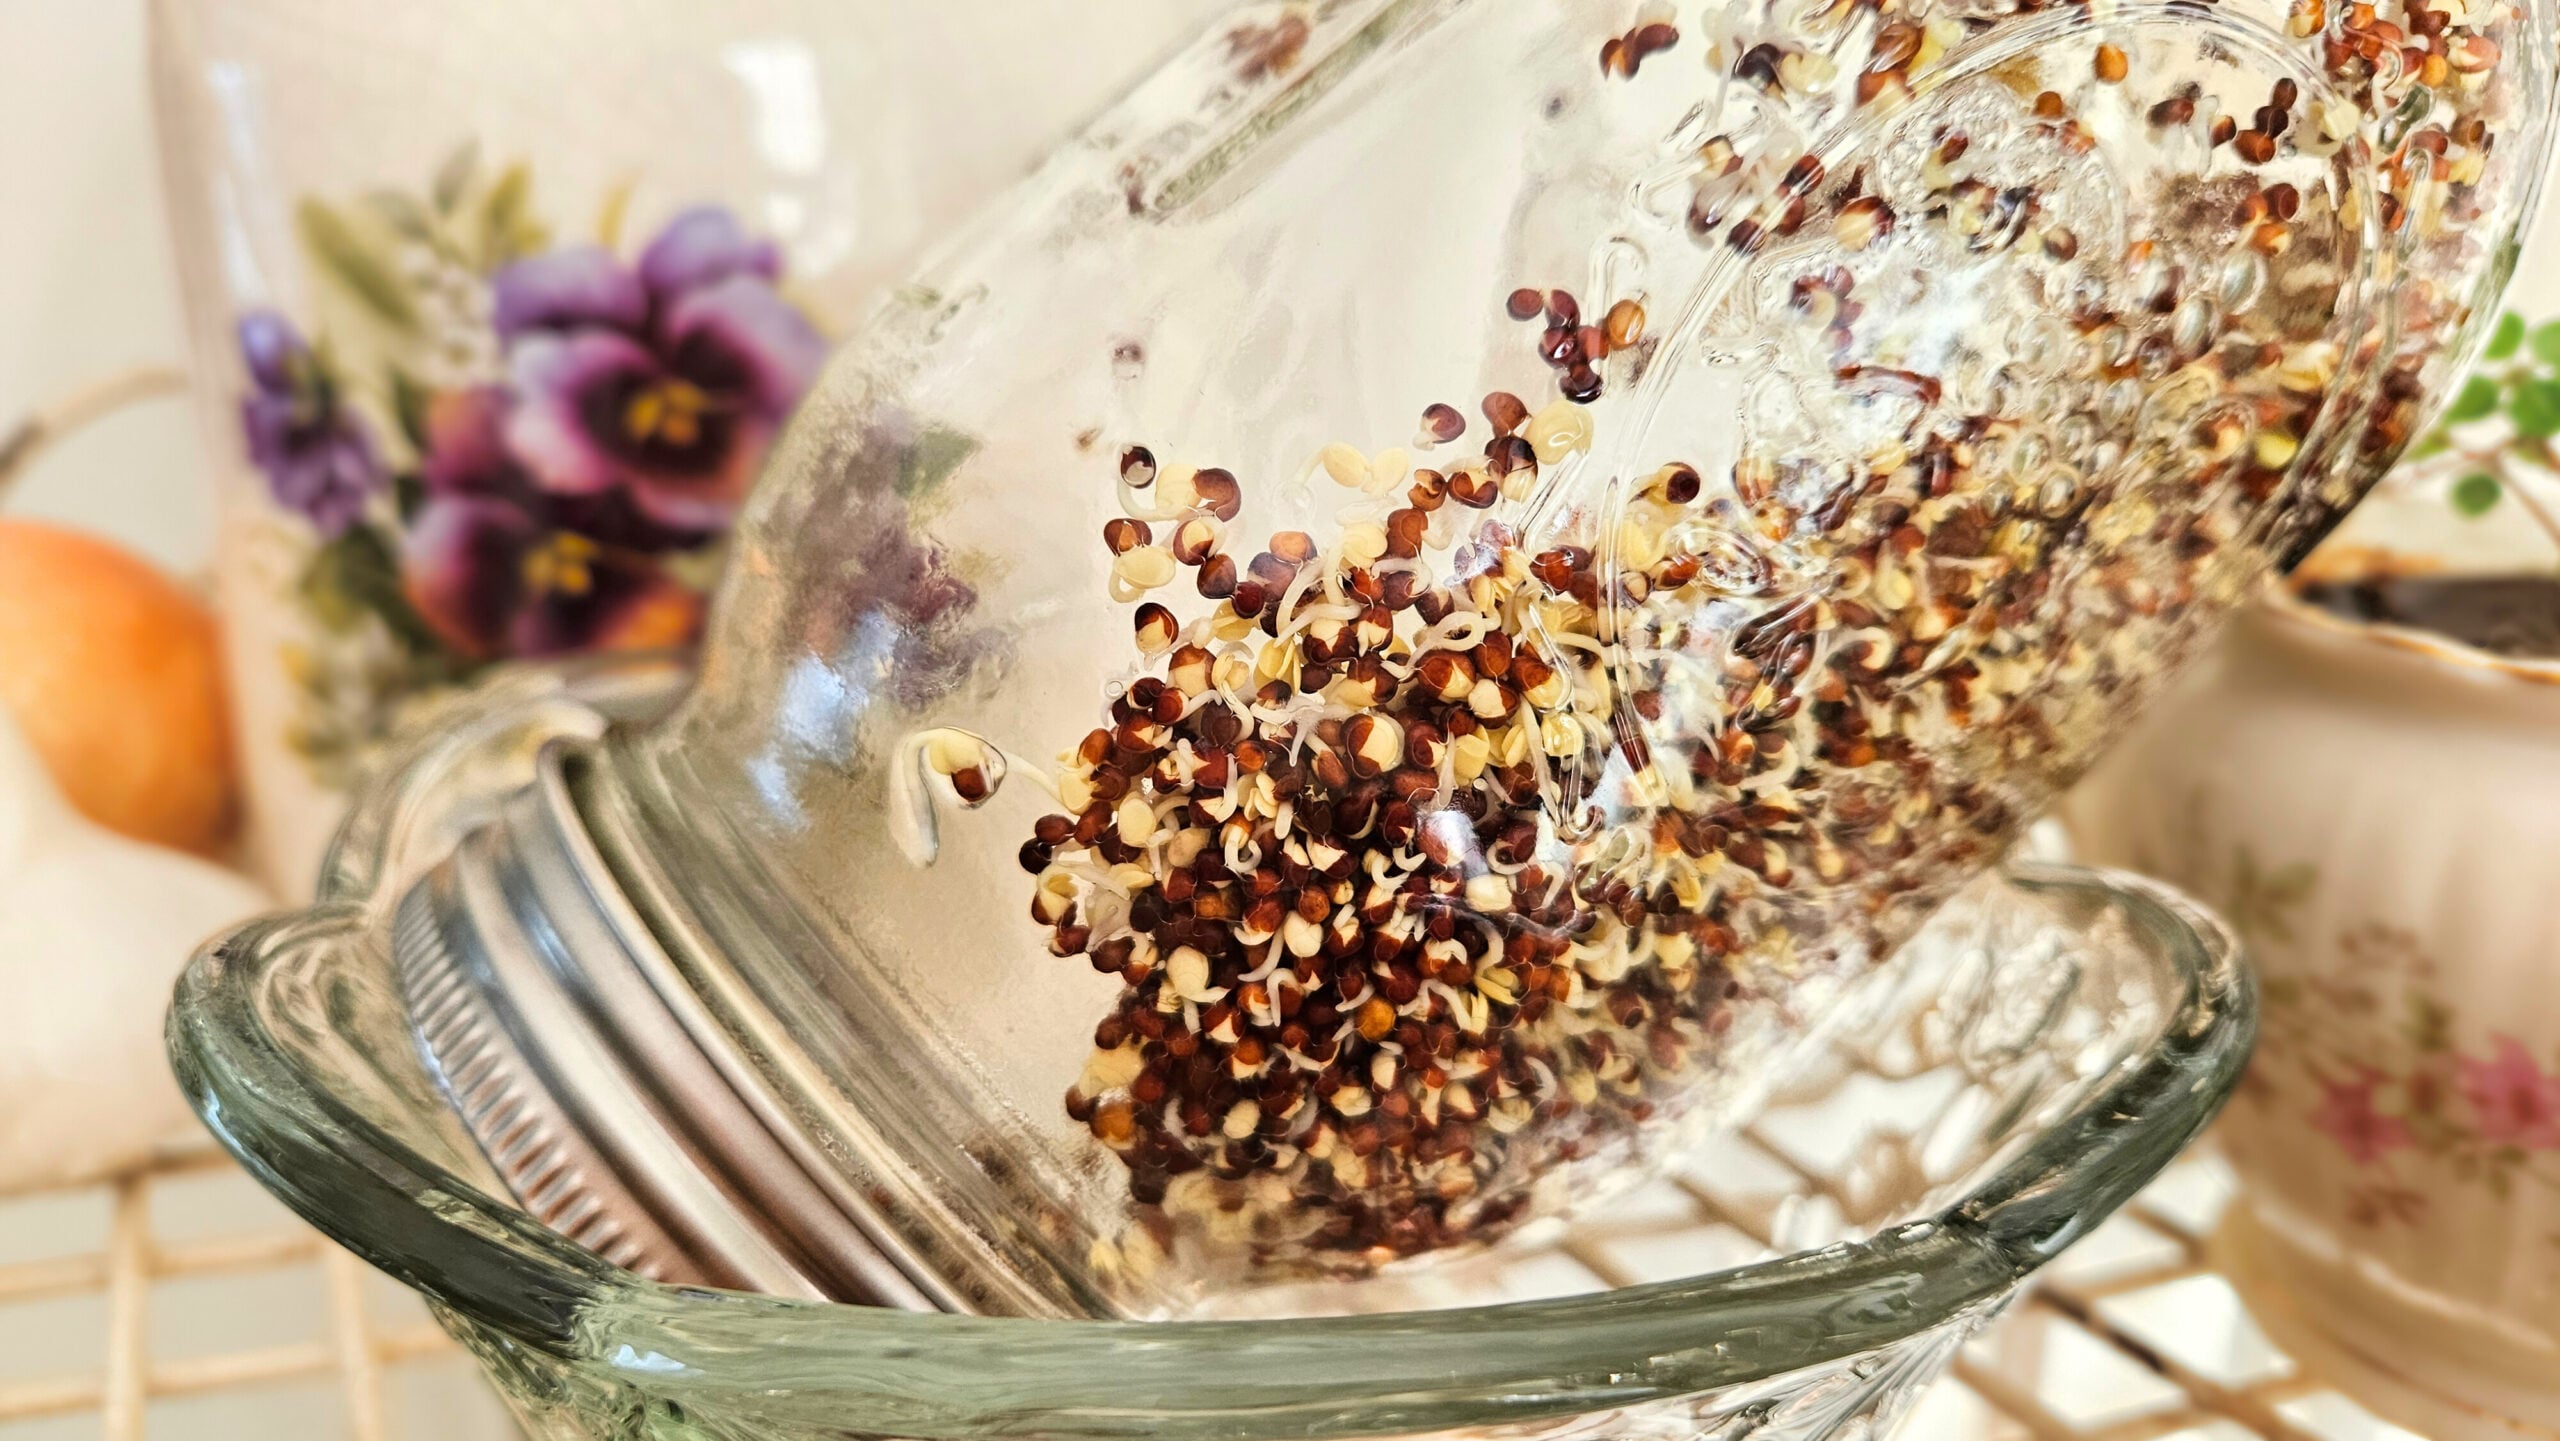
- Twice a day, morning and evening, fill the jar with filtered water, swirl the seeds around, and then drain all of the water out. Allow the mason jar to rest tilted in the bowl again.
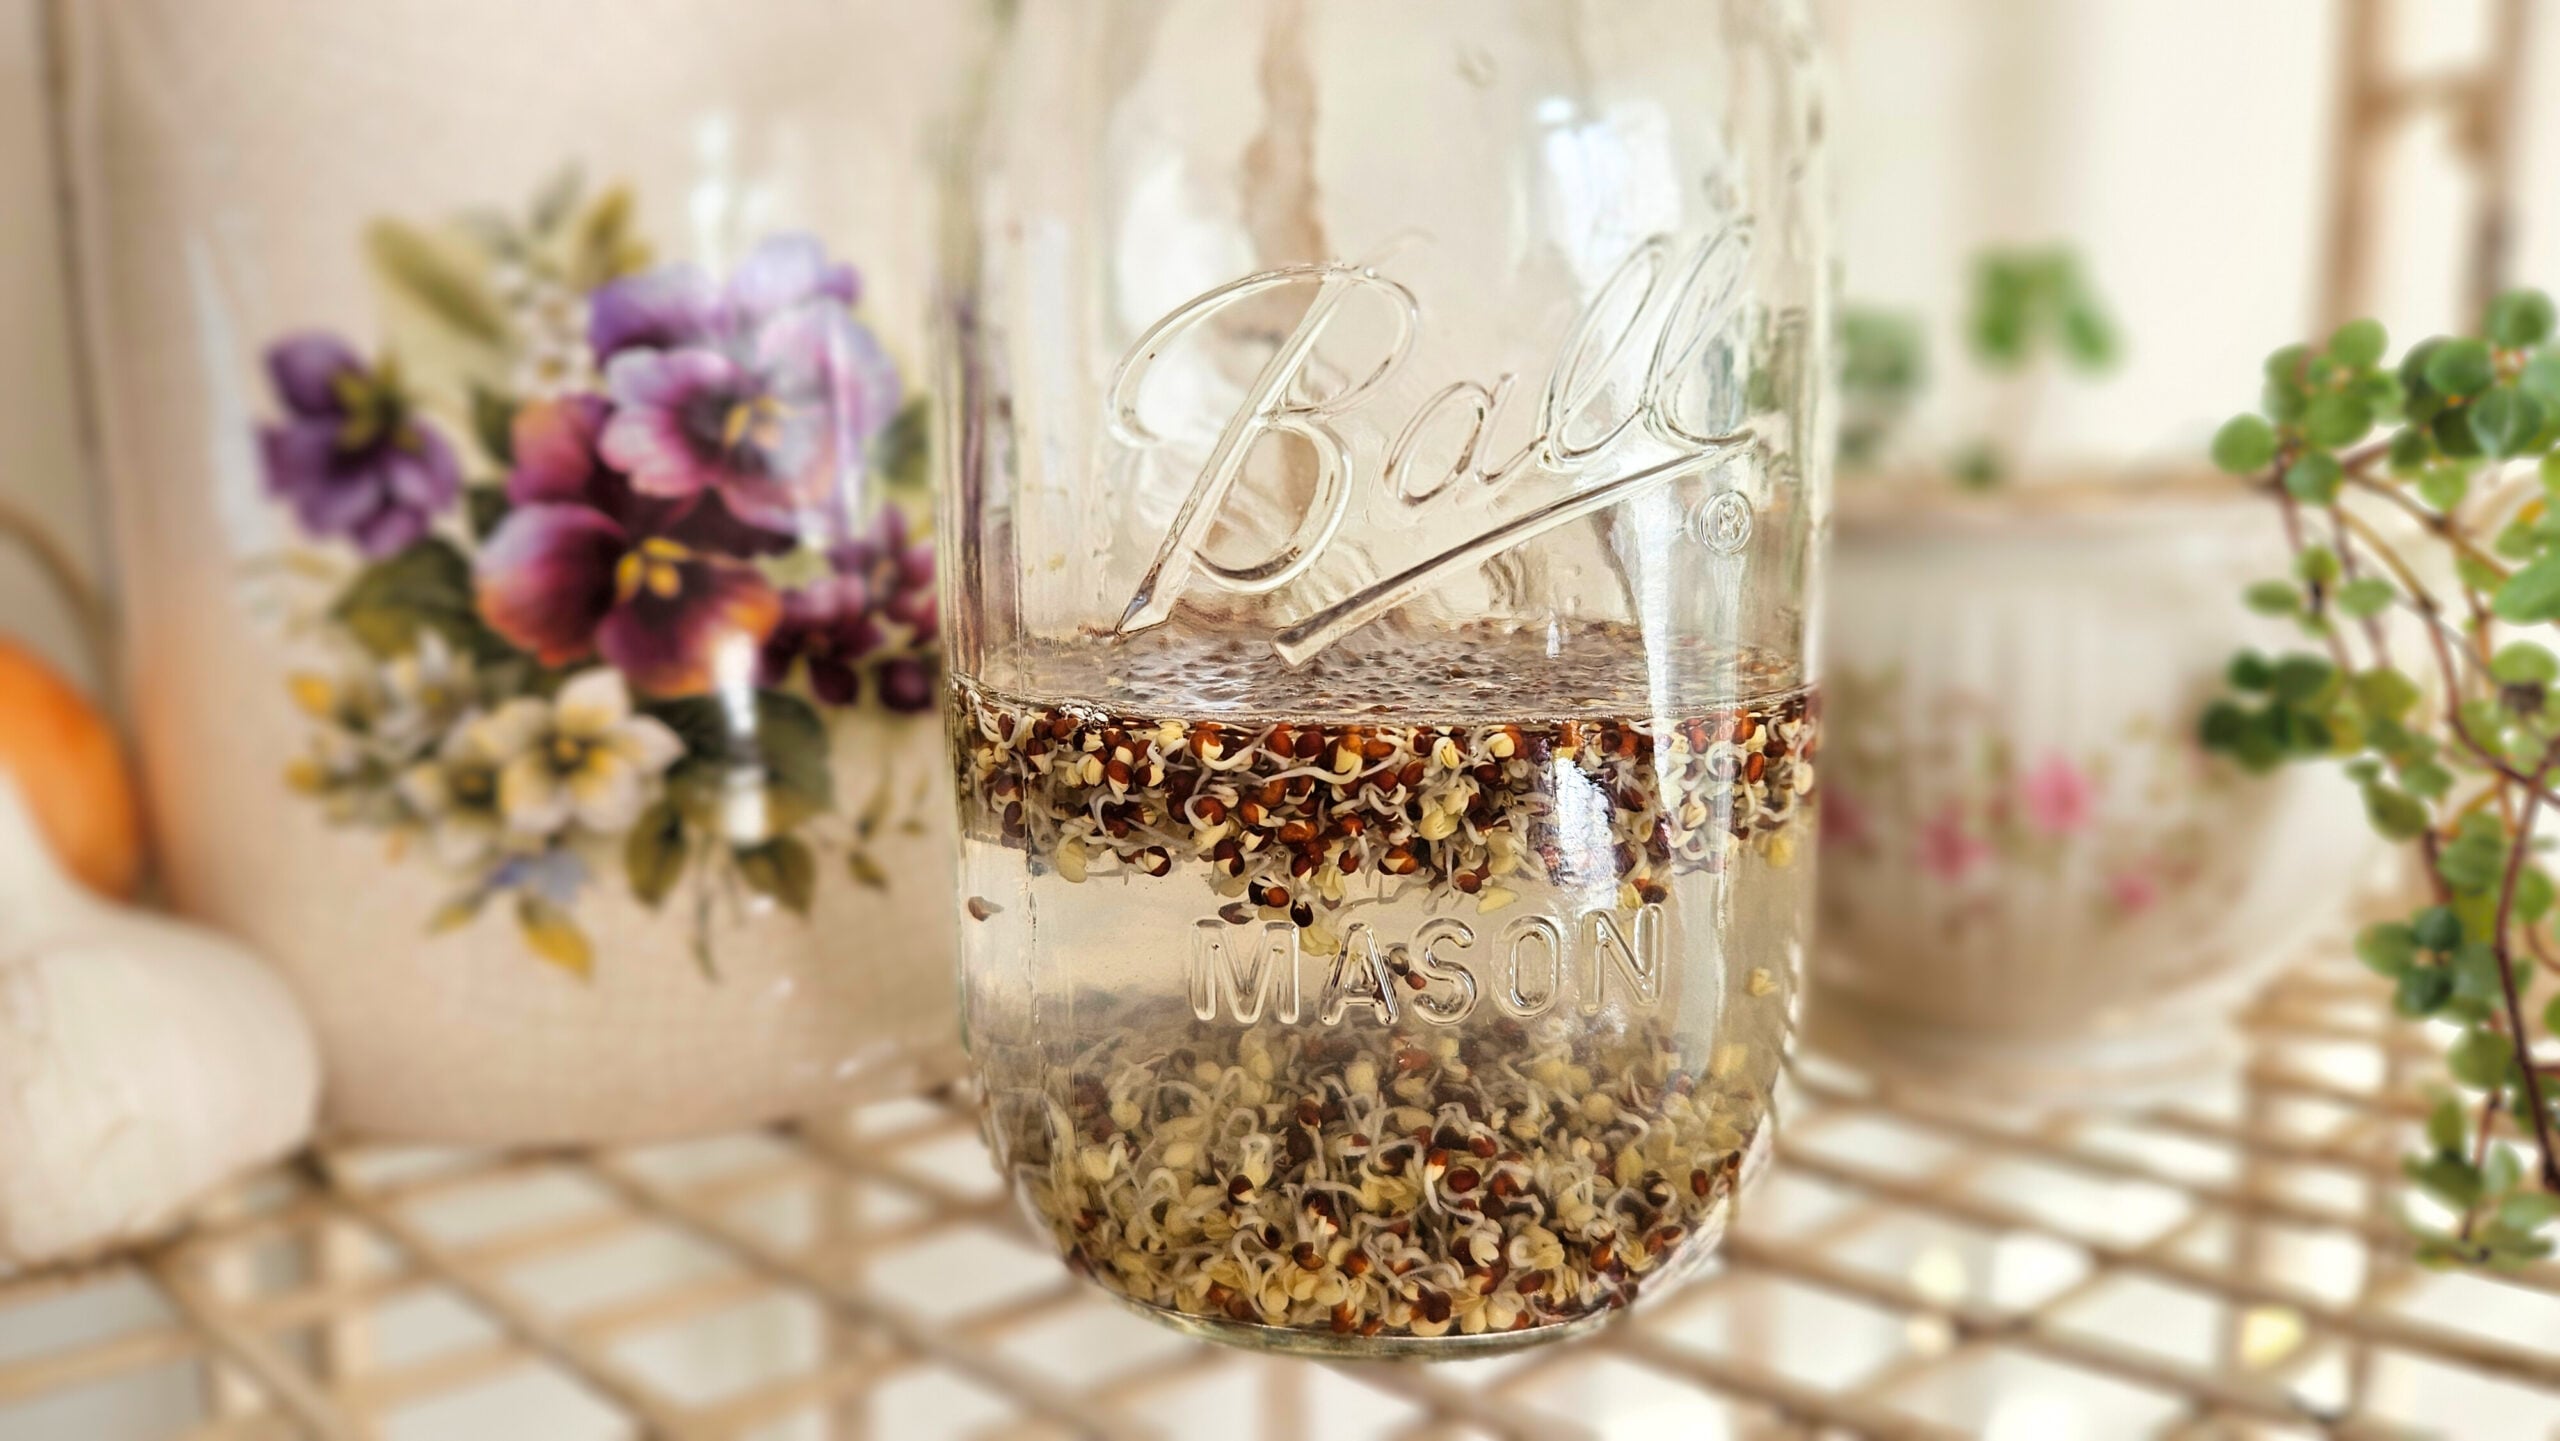
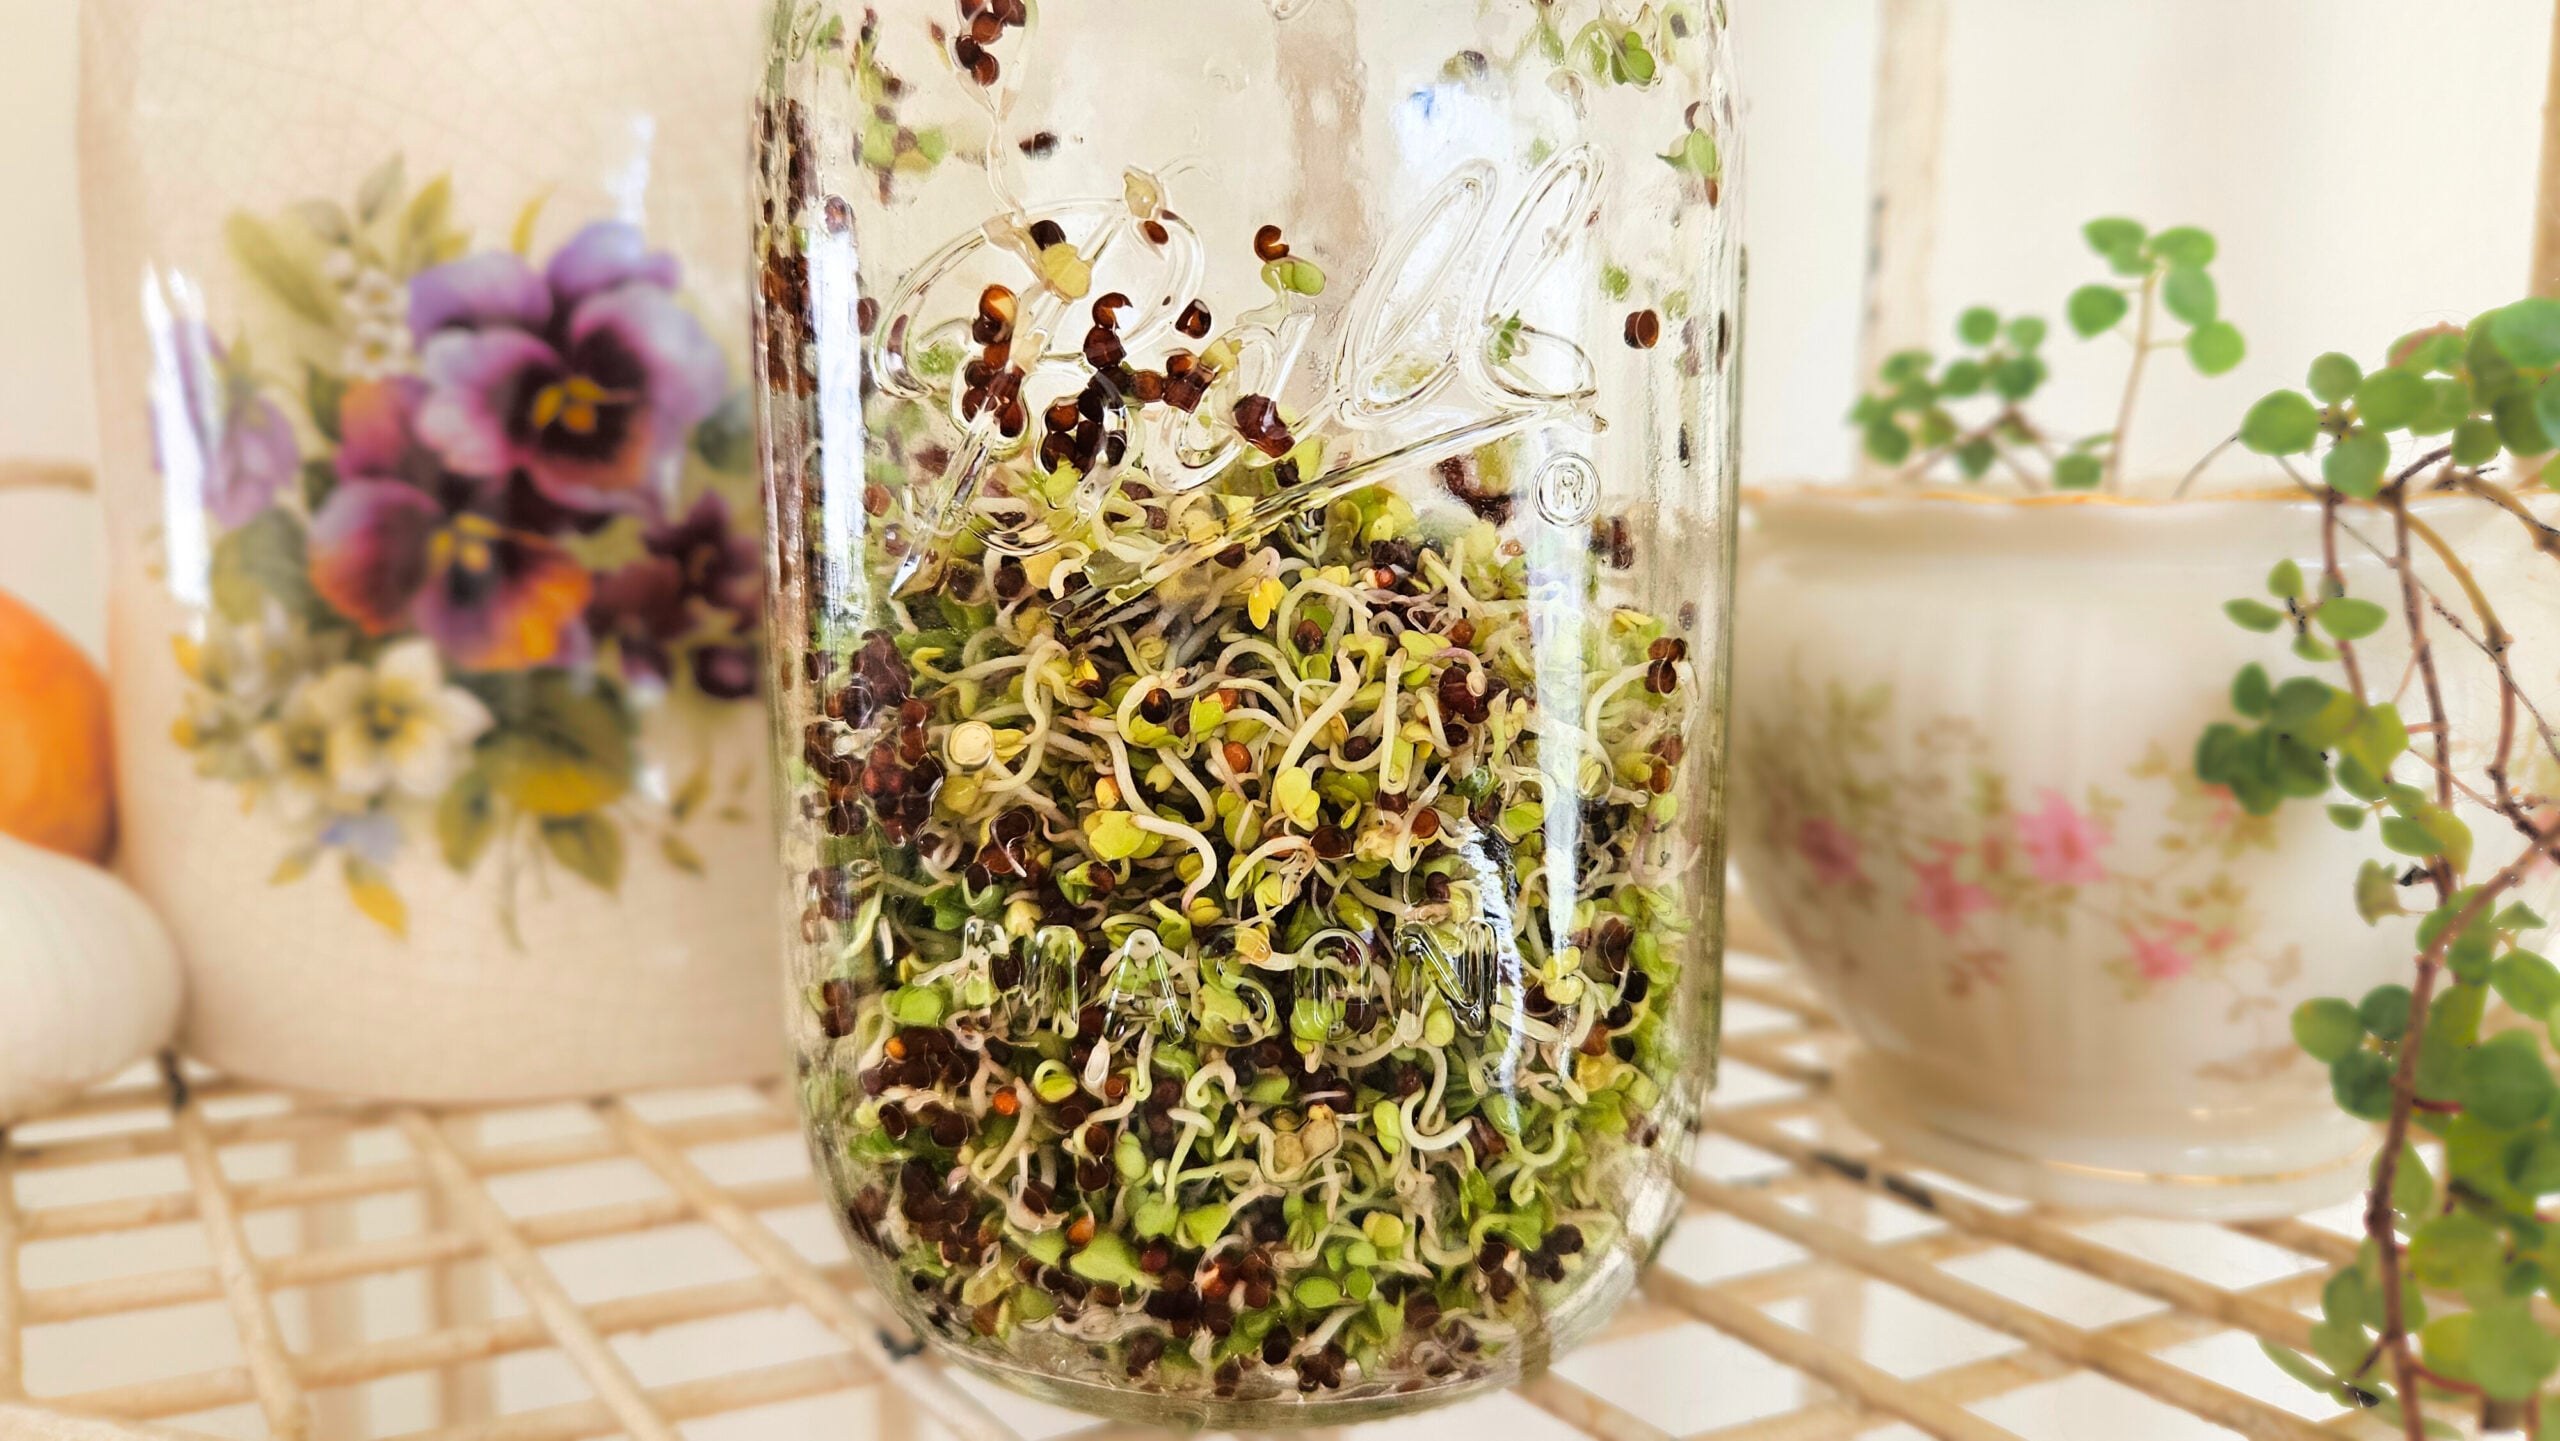
- Once the seeds are fully sprouted, usually on day 3, give them one final rinse and draining, and transfer them to an enclosed container.
- Keep refrigerated and enjoy!
Tips
- Purchase your broccoli seeds from a good source.
- Always use filtered water. Chlorine and other chemicals in tap water can negatively impact the seeds being able to sprout, and the quality of the end product.
- You’ll know the seeds are done sprouting when they are 1-2 inches long with open green leaves.
- You don’t have to attempt to remove the seeds from the sprouts. They are perfectly fine to consume along with the sprouts.
- If you are using the seed sprouting lids that I have linked, you won’t be able to use a wide mouth mason jar. You’ll have to use a regular one.
- 2 tbsp of seeds and a quart size mason jar are the perfect combination. If you want to grow more sprouts at a time, you’ll have to increase your jar size to accommodate more room.
- Don’t let your seeds soak too long. I have done that before and the sprouts didn’t smell pleasant when I was done making them.
- Shake as much water out as you can during the rinsing and draining process! If the seeds and newly forming sprouts sit in standing water, they’ll become oversaturated and mushy.
- Periodically dump the bowl that the jar is resting in to prevent the sprouts near the jar opening from sitting in standing water.
- Broccoli sprouts don’t last long. Always keep them refrigerated and consume within a week.
Ways to Enjoy
While I mostly eat my broccoli sprouts plain, here are some additional ways to enjoy them:
- Salad topper
- Pizza topper
- In sandwiches and wraps
- Smoothie addition
- Garnish (soups, snacks, stir fries, etc.)
- Pesto sauce
Cost-Benefit Analysis
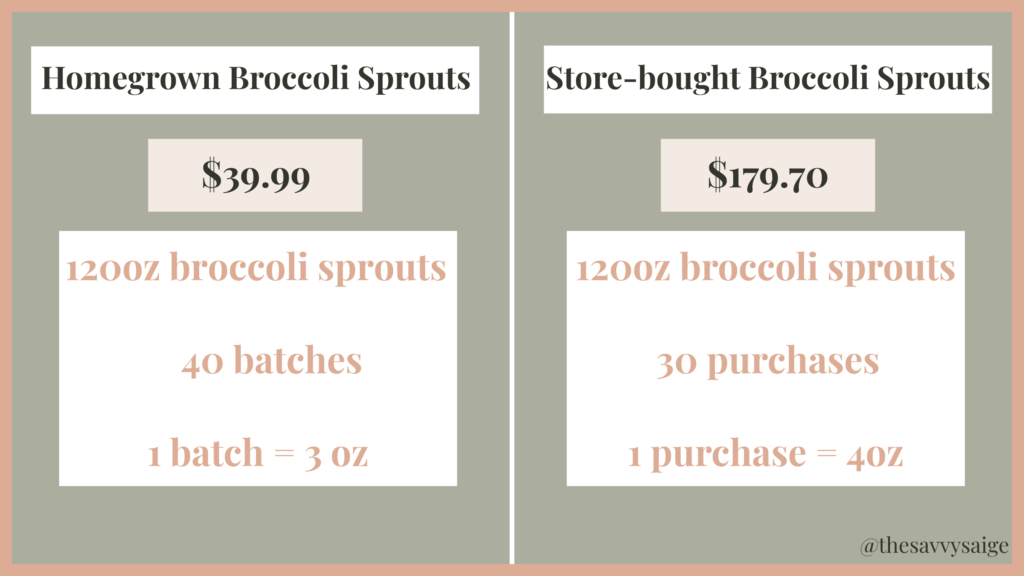
After trying several brands for broccoli seeds, the Waltham 29 Variety from Rainbow Heirloom Seed produces my favorite flavor and crunch. They are a non-GMO heirloom variety.
Here is the cost breakdown of purchasing broccoli seeds in bulk vs. purchasing broccoli sprouts at the grocery store.
As of August 2025 in the state of Tennessee:
Waltham 29 Variety Broccoli Seeds (product link)
- $39.99 for 2.5lb (40oz) bag
- 40oz = 80 tablespoons
- 80 tablespoons= 40 batches of broccoli sprouts
- 1 batch of broccoli sprouts = 3oz
- 40 batches = 120oz
Store-bought Broccoli Sprouts
- $5.99 for 4oz
- 4oz x 30 purchases = 120oz (see above)
- 30 purchases x $5.99 = $179.70
Making my own broccoli sprouts at home is nearly 4.5x less expensive than buying them at the store. Not sure about you, but I’ll take the time to make them!
More Seeds That Can Be Sprouted
FAQs
Related Posts
I hope you feel confident making your own broccoli sprouts at home and reap the benefits of doing so!
Cheers to sprouting! 💛
Broccoli Sprouts
Equipment
- 1 bowl
Ingredients
- 2 tbsp broccoli seeds
- Filtered water
Instructions
- Rinse broccoli seeds with filtered water.
- Place seeds in a regular quart size mason jar. Fill with water 2/3 of the way full. Cover the jar with the seed sprouting lid.
- Allow the seeds to soak for about 8hrs. I usually either start this in the morning and let them soak all day, or start this at night and let them soak overnight.
- After soaking, turn the mason jar upside down over your kitchen sink and allow all of the water to drain out. Shake the jar up and down to get the most amount of water out.
- Place the mason jar upside down in a bowl, so that the jar is tilting to the side allowing water drainage and air flow.
- Twice a day, morning and evening, fill the jar with filtered water, swirl the seeds around, and then drain all of the water out. Allow the mason jar to rest tilted in the bowl again.
- Once the seeds are fully sprouted, usually on day 3, give them one final rinse and draining, and transfer them to an enclosed container.
- Keep refrigerated and enjoy!
Notes
- Purchase your broccoli seeds from a good source.
- Always use filtered water. Chlorine and other chemicals in tap water can negatively impact the seeds being able to sprout, and the quality of the end product.
- You’ll know the seeds are done sprouting when they are 1-2 inches long with open green leaves.
- You don’t have to attempt to remove the seeds from the sprouts. They are perfectly fine to consume along with the sprouts.
- If you are using the seed sprouting lids that I have linked, you won’t be able to use a wide mouth mason jar. You’ll have to use a regular one.
- 2 tbsp of seeds and a quart size mason jar are the perfect combination. If you want to grow more sprouts at a time, you’ll have to increase your jar size to accommodate more room.
- Don’t let your seeds soak too long. I have done that before and the sprouts didn’t smell pleasant when I was done making them.
- Shake as much water out as you can during the rinsing and draining process! If the seeds and newly forming sprouts sit in standing water, they’ll become oversaturated and mushy.
- Periodically dump the bowl that the jar is resting in to prevent the sprouts near the jar opening from sitting in standing water.
- Broccoli sprouts don’t last long. Always keep them refrigerated and consume within a week.
This is a personal blog. All posts, recipes, recommendations, and how-tos are for informational use and personal viewing pleasure only. Blog posts are not written by AI.


Very useful, thank you.
You’re welcome!